Rice Krispie Treats (a new recipe!)

I am sure the name “Rice Krispie Treat” is a household name for everyone living in the United States.  When I was growing up in Alaska, the internet was still nascent and any type of recipe I knew came from either my mom, one of my mom’s cookbooks, or recipe cards handed between friends.  As a child I knew Rice Krispie Treats to be made of toffee, butter, marshmallows, and Rice Krispies.  Thus I was surprised when I was in elementary school and I got these treats and they were only made of marshmallows and Rice Krispies.

This recipe is for you mom!

Ingredients

  • 6 ounces butter
  • 6 ounces marshmallows
  • 6 ounces caramels
  • 6 ounces Rice Krispies

Instructions

Melt the butter, marshmallows, and caramels in a large saucepan or in the microwave until completed melted.  Mix in the Rice Krispies into the mixture until they are evenly coated.  Pour the mixture into a non-stick or well-greased pan 8 by 8 pan and spread out so that the top is even and flat.  Let set for a few hours, then cut into triangles or squares.  Store in an air-tight compartment in a cool place.

****

I have to confess that I modify this recipe often when I make it and the reason is because it is so simple to do.  I made caramels one time when I tried this recipe because I have leftover sugar and milk.  For those of you who know how to make caramels go for it – otherwise it is certainly easier to buy them.  I got everything at Whole Foods – they have natural marshmallows (several varieties in fact), as well as several kinds of caramels.  This is a great recipe to make with kids because they have do much of it themselves, with the exception of adult supervision for the stovetop or taking the bowl out of the microwave.  One thing about this recipe that I learned at a young age was that patience is imperative – I needed to wait for the marshmallows to melt and even beat the mixture a bit to encourage that!

HW

Hummingbird Cupcakes

I first heard of Hummingbird Cake just after the first time I heard about Red Velvet Cake.  Both are thought of as Southern cakes and are definitely quite unique.  My first attempt at Hummingbird Cake was several years ago as the featured item at two friends’ birthday lunch.  In a trend somewhat similar to President’s Day is a date between Jefferson’s and Washington’s birthday, I also chose a random weekday (not a Monday obviously) to bring in cake to make the occasion.  I decided to go for the healthier version of the cake as the original version I found used quite a bit of vegetable oil, and so I went for the applesauce version instead.  While the combination of flavors was good, the applesauce made the cake a bit hard.  My friends did not complain about the cake, but I did not get much positive feedback either.

So I recently dipped my baking hand back into the realm of this cake again, except this time I made Hummingbird cupcakes.  I love cupcakes as they are the perfect size to give to friends to try – obviously what I did here and for many recipes!  I took a recipe from Southern Living and adapted it a bit from the recipe found here (and I also made it with mascarpone instead of cream cheese):  http://www.myrecipes.com/recipe/hummingbird-cake-0

Ingredients (make 11 cupcakes)

  • 1 cup flour
  • 2/3 cup sugar
  • 1/3 teaspoon salt
  • 1/3 teaspoon baking soda
  • 1/3 teaspoon ground cinnamon
  • 1 large egg, beaten
  • 1/2 cup vegetable oil (use expeller pressed oil)
  • 1/2 teaspoon vanilla extract
  • 3 ounces crushed pineapple
  • 2/3 cup mashed bananas
  • 2/3 cup chopped pecans, toasted (half for the cupcake, half for the frosting)
  • 1/2 package cream cheese
  • 2 cups powdered sugar (to taste)

Instructions

  1. Preheat oven to 350 degrees Fahrenheit
  2. Whisk together the flour, sugar, salt, baking soda, and ground cinnamon into a large bowl, then add the eggs and oil, stirring until just combined
  3. Next stir in vanilla, pineapple, bananas, and pecans
  4. Spoon the batter into the liners you have placed in the muffin tin
  5. Bake for 20 to 25 minutes, until the tops are a light golden brown
  6. To make the frosting, beat together the cream cheese and powdered sugar (as a side note, I always add powdered sugar to taste and not according to recipes necessarily)
  7. You can mix in the toasted pecans with the frosting or sprinkle it on top (I sprinkled it on top) – you will have to wait until the cupcakes cool to frost them!

These cupcakes are moist and I love the frosting (I used mascarpone rather than cream cheese for this one).  You can also turn this into a cake if you double or triple the recipe and grease a cake tin rather than use a muffin tin.  As you can see from the photo below, it looks a bit like banana bread – very moist and succulent.

thumb_IMG_1800_1024

HW

Chocolate Crunchies

And now for one of my favorite childhood recipes!  I love everything about this recipe, from the crunchy textures to the thick syrupy chocolate coating.  If I remember correctly this was one of the first recipes I made as a child as it did not involve an oven and for the most part my mom could supervise the melting of the liquid ingredients.  You can make this on a stovetop or in the microwave, depending on your preference and what equipment you have available.  It is also a great way to introduce children to baking (using myself as a fantastic example of that) as it gives them great autonomy to make something, but there are not too many danger areas (just the hot pot).

This recipe is great for children of all ages (including adults of course).  So here it goes!

Ingredients (makes 12)

  • 1 1/2 cups corn flakes
  • 3 tablespoons Lyle’s golden syrup (can be found at Cost Plus World Market or other specialty grocery stores)
  • 3 ounces butter
  • 3 tablespoons cocoa powder (I used cacao powder in my recipe because that is what I had on hand)

thumb_IMG_1789_1024

Instructions

  1. Melt the syrup, butter, and cocoa powder in a small pan or in the microwave, and when it is fully melted and combined, remove from the heat
  2. Stir in the corn flakes until all the chocolate mixture evenly covers all of them – don’t over-combine or you will crush the corn flakes!
  3. Spoon the mixture into liners placed in muffin tins and allow to cool completely before serving

Depending on how many crunchies you need to make, to scale this recipe according to how many treats you plan to make (certainly it is very easy to double the recipe, especially if it is for a large crowd).  If you are doing it for kids or even a children’s birthday party, you could also put decoration or sprinkles on the top before the treat cools completely.  Have fun with them!

HW

Holiday Season: Pancake Tuesday

Also known as MARDI GRAS!!

Mention Mardi Gras to anyone in Louisiana (or in Texas) and they imagine the packed streets of New Orleans in the week leading up to the event with green, purple, and gold beads everywhere.  And of course they imagine king cake in every possible flavor, decorating with these bright colors and icing.

However, growing up I knew never little about Mardi Gras.  My only knowledge of the Cajun culture was from this little restaurant called the Double Musky Inn in Girdwood, Alaska (very close to my hometown of Anchorage) that served Cajun food.  It was quite dark inside and I think it got crowded and wild later, which explained why my parents always had us leave by about 8…

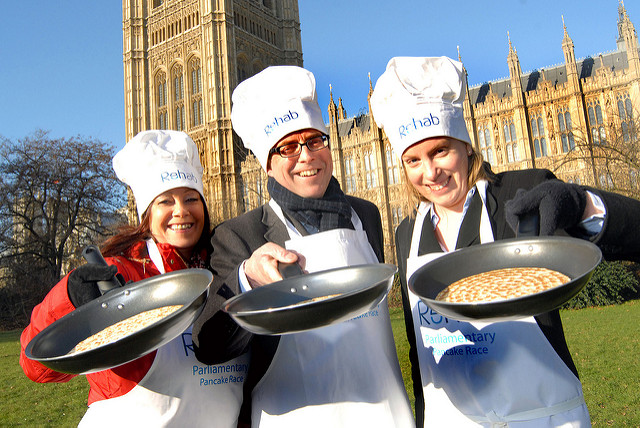
Since that was all I knew about Cajun culture, I knew Mardi Gras growing up as Shrove Tuesday, but I really knew it as Pancake Tuesday more than anything else.  Pancake Tuesday, as the name implies, involves eating pancakes, and more specifically eating them for dinner.  Fat Tuesday is the last day to feast on richer foods like butter, sugar, and eggs before Lent begins.  Check out the fascinating rundown by BBC News on the history and significance behind these celebrations.  In a celebration analogous to Mardi Gras, the British celebrate Fat Tuesday with pancakes, not just making them, but also pancake races, including this race by UK Members of Parliament (see the feature photo at the top of this page as well).

While restaurants do a much better job making crepes than I do (much thinner certainly), it is the fun of the occasion that makes it worth doing.  Beside it is fun to have people over as part of the celebrations!  I always make basic crepes and then have orange slices and maple syrup on hand as toppings, and guests bring their favorite toppings.  The recipe I use is from Williams-Sonoma, and you can easily double or triple the recipe (I certainly do).

Ingredients (makes about 4 crepes – mine are a bit thicker)

  • 1 cup milk
  • 1 egg
  • 1/2 cup plus 1 tablespoon plain flour
  • 1/2 tablespoon melted unsalted butter plus more butter for cooking the pancakes
  • 1/2 teaspoon salt

Instructions

  1. Combine the milk, egg, flour, melted butter, and salt in a bowl until smooth
  2. Cover and refrigerate overnight (if this is possible, otherwise refrigerate for a few hours)
  3. Put a pat of butter in the bottom of a medium sized frying pan, letting it melt and cover the pan evenly
  4. Tilt the pan at a slight angle and pour enough batter on the pan to completely cover the bottom of it (it may take a few attempts to get the right amount on the pan)
  5. Cook until the top of the crepe looks bubbly (should take just a minute or two)
  6. Flip the crepe and cook the other side for another minute or two – when do put on a plate to serve or store covered with foil to keep warm
  7. Repeat steps 3 through 6 for each crepe, making sure to put a pat of butter on the bottom of the pan for every crepe before you starting making it

My favorite toppings are maple syrup and a squeeze of freshly sliced orange.  Nutella and fruit is always good, especially for kids.  If you like a more savory crepe you can put cheese or protein in the crepe.  Be creative!  If you are still slightly intimidated by the process of making crepes, check out YouTube as there are loads of good videos to help you learn the techniques!

HW