Culinary Tour: J.P. Licks

Since I worked a lot of Boston this summer, it was only logical that I tried out some of the best ice cream spots.  So a bit of Yelp research and asking the front desk at the Hilton Hotel that I was staying at in Back Bay Boston led me to try out the local ice cream store down the street.  And thus I was introduced to J.P. Licks!  Known for homemade ice creams and frozen desserts, this spot is a staple in many locations across the Boston area.  I was quite impressed with the number of options and they are big on mix-ins for the ice cream. Here is their website!

It was really interesting reading about the history of the ice cream shoppe – you can check that out here!  The original location opened up in 1981 in the Jamaica Plain neighborhood of Boston.  They are known for intense flavors that are pretty unique and eclectic.  Check it out the next time you are in Boston!

HW

Lavender Ice Cream

My first taste of lavender ice cream was at The Bent Spoon, a fantastic sweet spot in downtown Princeton, New Jersey.  The adventure probably encouraged me to start making my own ice cream – it was sooooo good!  Check out their website here:  http://www.thebentspoon.net  (and if in doubt, read the Yelp reviews!)

Given my recent adventures with rose water ice cream, it was only a matter of time before I tried my hand at another flower flavor – this time lavender!  I will be upfront about this – unlike the flavors of rose water ice cream, lavender ice cream can be very strong – so not a food for everyone!  But I am a huge foodie (no surprise there) and thus up for trying anything…

Epicurious have some great recipes, so I used the lavender ice cream recipe that I found on their website.  Here it goes!

Ingredients

  • 2 cups heavy cream
  • 1 cup half-and-half
  • 2/3 cup honey (preferably a milder kind)
  • 2 tablespoons dried lavender
  • 2 large eggs
  • 1/8 teaspoon of salt (just a dash of salt!)

Instructions

  1. Put the cream, half-and-half, honey, and lavender in a saucepan and bring to boil, stirring occasionally.  Remove pan from the heat (keep it covered), allowing it to steep for 30 minutes.
  2. Pour the cream mixture through a sieve into a bowl and discard the lavender.  Put the mixture back in the saucepan (clean it first) and heat over moderate heat until hot.
  3. Whisk the eggs and salt together in a separate bowl, then add a cup of the hot cream mixture to the egg mixture, whisking at the same time (this tempers the mixture so the eggs do not curdle).
  4. Pour the rest of the egg mixture into the saucepan, whisking.  Allow the mixture to cook on low heat until it is thick enough to coat the back of a spoon.
  5. Pour the custard mixture through the sieve again into a bowl.  Allow the mixture to cool in the bowl (covered) for several hours in the fridge.
  6. Put the mixture in the ice cream maker for 20 minutes or until it has finished churning.  Transfer to an airtight container and freeze completely in the freezer.

I LOVE making ice cream, so if anyone has an ice cream idea they would like me to find a good recipe for – please let me know!

HW

Blackberry Sherbet

I remember my first foray into ice cream making was when my mom and I went to a Williams-Sonoma cooking class over the summer several years, and the topic for the week was summer fruit.  The cooking instructor made pies, fruit salad, and yes, ice cream.  I was quite surprised (and pleased!) when my mom decided to buy an ice cream maker after the class was over.  The first time I made ice cream, I followed the recipe for the strawberry ice cream that the instructor had made (and that we subsequently sampled) in the class handout.  It was a custard based ice cream and my first experiment with the ice cream maker tasted good, but it was not exactly the texture and the result I was looking for.  So I started trying out a number of different recipes, from the recipes in the book that came with the ice cream maker to researching ideas for flavors that I found online.

The Williams-Sonoma website has a fantastic selection of recipes.  I typically stick to the sweets and desserts selection (to no one’s surprise), and this is a recipe I found a few years ago, and it has been a huge hit when I make it for friends.  The nice thing about the recipe is that you do not have to do any cooking before churning the ice cream and the most time consuming part of the recipe is preparing the blackberry juice that goes into the mixture.  So here it goes!

Ingredients

  • 2 1/2 cups frozen blackberries
  • 1/2 cup sugar
  • 1 1/4 cup buttermilk
  • 2 teaspoons lemon juice (preferably fresh lemon juice)

Instructions

  1. Thaw out the blackberries until they are soft
  2. Use a sieve to puree the blackberries and leave the seeds in the sieve – press on the mesh until all the juice is extracted
  3. Mix together then blackberry juice, sugar, buttermilk, and lemon juice until the sugar dissolves
  4. Put the mixture in an ice cream maker for 20 minutes, or until the mixture is churned, then put in the freezer for several hours until solid

I think this recipe is awesome because it is pretty easy to make, has a nice creaminess to it, and is pretty low in fat.  The lemon juice makes it a little tart and perfect for a hot summer day!

HW

Coffee Coconut Ice Cream

They say that the world is divided into bakers and cooks.  While this is broad and probably not true, I know that I fall into the former category.  While I certainly like to eat main courses (which I often eat BEFORE my desserts) and as it can be inferred from my baking posts that I also love to eat savory food from other cultures.  But back to being a baker…

My kitchen is pretty well equipped to bake something at a moment’s notice.  I bought cold coffee brew concentrate earlier this summer for another baking project and was trying to figure out what other recipes I could try out with coffee in them – and of course coffee ice cream came to mind.  I have a can of coconut milk on hand, and also raw sugar and vanilla extra that I always have on hand.  I have tried recipes from minimalistbaker.com out before and I think they have some great recipes.  And this one was no exception!  Here is the direct link to their coffee coconut ice cream recipe.  I modified it a bit when I made it because I only had one can of coconut milk, and I also wanted to just try out a sample.

Here it is!

Ingredients

  • 1 can coconut milk (full fat coconut milk preferred)
  • 1/2 cup raw sugar
  • 1/3 cup of coffee concentrate
  • 1/2 teaspoon of vanilla extract

Instructions

  1. Heat up the coconut milk, raw sugar, coffee, and vanilla (all the ingredients!) in a small saucepan until all the sugar has dissolved
  2. Take the mixture off the heat and pour it into bowl, then chill in the fridge until the mixture has cooled – I think I put it in for 30 minutes
  3. Put the mixture in an ice cream maker and freeze according to the manufacturer’s instructions – I put mine in the ice cream maker for 20 minutes

As soon as I tried this ice cream out I wondered why I had never ventured into coffee ice cream before!  It is so easy to make and really hits the spot when you eat it.

HW

Deliciously Ella: Sweet Potato Brownies

There is nothing better than thoroughly enjoying food and it being nutritious at the same time!  Recently I have been in search of healthy recipes for normally very indulgent foods like pie and brownies.  I have found a number of fantastic recipes for both those kinds of foods.  A few previous blog entries have included some recipes I have made a number of times, but this was my first got at this particular recipe.  Of course I have a bit of a funny story about it.  I picked up sweet potatoes a week or so before I decided to try this recipe out, but I did not pick up orange or reddish sweet potatoes, but purple ones.  To be honest I did not realize just how deep the color of the vegetable was until I was mashing it up.  The proof is in the photo below.

thumb_IMG_1832_1024

I posted Ella Woodward’s raw brownie recipe just recently.  If you like dates as much as I do, that is a fantastic recipe and it is a bit easier since it does not require any actual baking.  However, dates are not for everyone and can make recipes quite sweet, which is certainly a great excuse to try other recipes out.  Because it is made with a sweet potato base and does not contain very much sweetener (maple syrup is used in place of sugar) it has a much different taste than other brownies.  Ella Woodward is a British food blogger who turned to health food as a way to overcome a debilitating illness.  You can read all about her struggle and gravitation towards a healthy diet in this article in the Daily Telegraph online.

Below is a video by Ella on how to make the sweet potato brownies.  Underneath the video is the written recipe.

Ingredients (make about 10 brownies

  • 2 medium/large sweet potatoes
  • 2/3 cup almond meal
  • 1/2 cup flour (whole wheat, buckwheat, or brown rice flour)
  • 14 medjool dates (make sure they are all pitted)
  • 4 tablespoons cacao powder
  • 3 tablespoons maple syrup
  • Pinch of salt

Instructions

  1. Heat the oven to 350 degrees Fahrenheit
  2. Cook the potatoes in the oven until they are very soft, then take them out and take the skins off them (this is different that what Ella does – she peels and steams them until they are soft – do whatever method you prefer)
  3. Mash up the sweet potatoes, and then use a food processor or hand mixer to make the mixture smooth, then add the date and mix/process until the mixture is combined and smooth
  4. Add the rest of the ingredients and mix until completed blended and smooth
  5. Spoon brownies into a greased 9 by 13 inch baking pan (I greased mine with coconut oil), and bake for 35 minutes or until a knife in the middle comes out clean.

As you can tell from the photos, mine has a slightly purple hue to it.  If you would like the brownies to be sweeter, add a bit more maple syrup (taste test the batter out if you do not do so already)!  Like black bean brownies, sweet potato brownies offer a hidden source of fiber.  Enjoy!

HW


Culinary Tour: Rose Water Ice Cream

July 17th is Ice Cream Day!!  So I find this an appropriate post for the day…

As you noticed from the previous post about ma’amoul cookies, I began to dabble in the use of rose water as an ingredient in recipes.  My friend who grew up in Saudi Arabia actually puts rose water in her tea, but I sought out an excuse to make another sweet recipe!

While ma’amouls are Arabic in origin, rose water ice cream is Persian in origin.  Food geography fascinates me in that it is a continuum of amazing food across continents, and while cultures have their own unique culinary traditions, it is never very far from the culinary traditions of its neighbors.  Since I already had rose water on hand, I just need to pick up the regular ingredients needed for ice cream, along with a bit of saffron that the recipe required.  I had a few friends who were new to the concept of rose water ice cream and the recipe was a hit!  I finished it off by sandwiches the ice cream between two layers of flavorless wafers.  The wafers, like the rose water, is available at Middle Eastern grocery stores (Phoenicia is a great spot for those of you living in Houston!).  Here is the recipe as per the site I found it on.

Ingredients

  • 1 ½ cups whole milk
  • 1 ½ cups heavy cream
  • ¾ cup granulated sugar
  • Pinch of saffron threads, ground down with a mortar and pestle (or you can use your fingers)
  • 3 tablespoons rose water
  • 3 large egg yolks
  • ¼ cup chopped pistachios (optional, but highly recommended)

Instructions

  1. Dissolve the ground saffron threads in the rose water and set aside
  2. Combine the milk, sugar, and cream in a sauce pan on low heat and stir gently until the sugar is dissolved – heat will be ALMOST boiling
  3. Add the saffron and rose water mixture to the mixture in the pan
  4. Whisk the egg yolks until well combined
  5. Temper the egg mixture by pouring about ¼ cup of the milk mixture into the egg mixture 3 or 4 times and mixing thoroughly
  6. Add the rest of the egg mixture to the milk mixture and heat this until the combined mixture has a custard-like texture (it will be able to coat the back of a spoon)
  7. Once the mixture is cooked, pour it through a sieve to catch any small pieces of cooked eggs and saffron
  8. Refrigerate this mixture for several hours until cool, then put in an ice cream mixer for 20 minutes (or follow the manufacturer’s instructions) – **if you are adding pistachios, add them a few minutes before mixing is done

When you are done making the ice cream in the ice cream mixer, there are a few options for the finished product.  You can put it in a plastic container and freeze completely in the freezer.  OR you can make ice cream sandwiches by spreading ice cream between two flavorless pieces of waffle wafers.  See the featured photo for how mine turned out!

HW

Culinary Tour: Ma’amoul Cookies

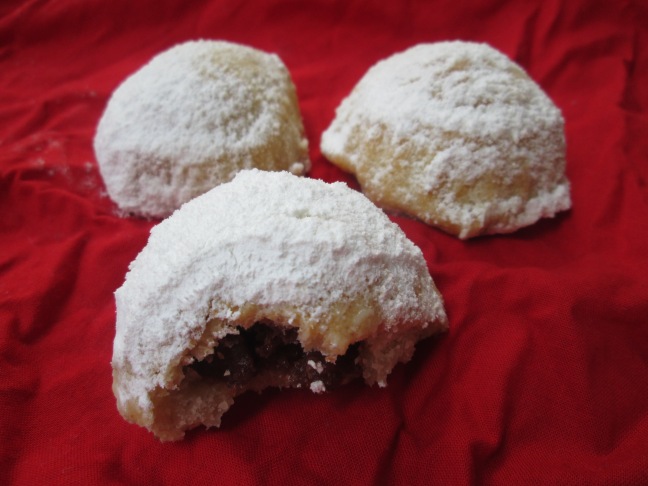
It is no secret that I am always in pursuit of the best sweets from any part of the world, and always willing to try a new dessert out.  I cannot remember the first time I learned about baklava, but I do remember how I learned about these amazing Middle Eastern cookies:  ma’amouls.  I was in a counter service Middle Eastern restaurant called Naf Naf in Evanston, Illinois (of all places), and I had just finished ordering and buying my plate of favorite spreads (think hummus, tabbouli, etc.).  At some point after I had completed the transaction, I looked down and noticed there was a little basket of cookies conveniently located next to the register that said “mamool cookies” on them.  I picked one up and studied it carefully, and asked the obvious “are these good?”  The lady at the register goes “try one” – so I did.  It was amazing.  Very similar to the shortbread cookie I know and love, but it also had a date filling, which made it even better.

So a curiosity was formed, and I proceeded to pursue a ma’amoul recipe of my own to try.  In the process I also learned a lot about the originals of these cookies.  The incredible thing that stuck out to me was that ma’amouls were widely consumed across the Middle East – and what really struck me was that they are popular as holiday cookies for many religions.  Literally every religion in the region has a special holiday that they make these cookies for.  Muslims make them for the Eid holidays and during Ramadan, Christians make them for the Easter, and Jews make them for a number of holidays.  Many people also smartly keep a stock of these cookies year-round (!!).  I am going to unashamedly admit that I need no excuses to make cookies at any time of year.

I did a bit of research on the cookies and also asked around to my friends who grew up in the Levant region, and one of them pointed to a recipe found on a website called Mama’s Lebanese Kitchen (thank you to my friend who grew up in Beirut for sending it to me!!).  I found a wooden ma’amoul mould that I liked online and ordered it (see the photo below).  Once that came, I made the trek (a very short journey mind you) to the Arabic grocery store in downtown Houston called Phoenicia to get the special ingredients (like semolina, rose water, etc.).

thumb_IMG_2021_1024

Here is the recipe on the website Mama’s Lebanese Kitchen.  When I made ma’amouls, I used the recipe on the website for the dough, and then I essentially created my own filling.  I make a lot of food with dates in it (in addition to eating a lot of dates), so I knew the consistency I wanted for the filling.  All the details are below!

Ingredients (for the dough)

  • 16 ounces (1 pound) semolina
  • 5 ounces farina
  • 1/2 cup sugar
  • 3/5 pound of butter, melted
  • 4 ounces rose water
  • 1 ounce orange blossom water
  • 1/6 teaspoon of yeast, dissolved in 1/4 cup of warm water
  • Ground mahlab to taste

Ingredients (for the filling)

  • Dates (half pound)
  • Sugar (to taste)
  • Rose water (a splash)

Instructions

  1. Mix together the semolina, farina, and sugar in a bowl
  2. Melt the butter, then pour over the top of the mixture
  3. Pour the rose water and orange blossom water on top of the mixture
  4. Blend the mixture together and add the mahlab, then dissolve the yeast in the warm water and add to the dough, kneading it through the dough
  5. Cover the dough with plastic wrap, then let it sit for 7 to 10 hours at room temperature (it will rise)
  6. When ready to make the ma’amouls, you can then make the date paste that goes inside the cookies
  7. If the dates are a little tough, soak them in water for a few minutes, then when they soften drain them
  8. Use a food processor or a hand mixer to make a paste-like mixture of the dates, then add sugar and rose water to taste
  9. Take a walnut-sized piece of dough and flatten it in your hand, then place it in the mould, pushing it into the shape
  10. Place a spoonful of date paste (enough to fill the center of the mould), then take a bit more dough to cover the top of it so it is flat
  11. Tap the ma’amoul mould so that the cookie comes out, then place it on a greased baking sheet about two inches apart from the other cookies (when you are almost done making the cookies, heat the oven – see below)
  12. Bake the cookies in a 400 degree Fahrenheit oven for around 20 minutes, or until the cookies are a little reddish-pink (keep checking the oven)
  13. Remove the cookies for the oven, and while they are still hot, use a sieve to sprinkle icing sugar on the top of the cookies, some of which will harden into a bit of a glaze
  14. Remove cookies from the cookie sheets, and transfer to a wire baking rack to cool – when they are completely cool, you can store them in an airtight container in a cool place (for summers in Texas, I store them in the fridge!)

The best part about making these cookies was sharing them with friends who were very familiar with these cookies (and therefore could offer feedback on my own experiment).  As I mentioned in prior blog posts, the first go at baking sometimes can provide iffy results, but I always use it as a learning experiment!  It was such fun baking with ingredients that were new to me, like rose water and different kinds of flours and spices.

HW

Holiday Season: 4th of July Sweets

Happy 240th birthday to the USA!!  While it is a great time to enjoy backyard grilling and microbrews, it is also a fantastic excuse for me to make some sweet creations.  My brother triggered my creative imagination for the 4th of July quite early when he decided to text me a photo of the display he saw on a trip to Trader Joe’s.  They were selling a vanilla cookie White House to commemorate the holiday.  This meant I only had to wait six months between holiday house constructions!  (The other construction being gingerbread houses for the Christmas season obviously.)

I was quite impressed with the detail on the box, and the fact that the kit only cost $7.99.  Apparently in my family the question was not IF I bought the kit, but when I decided to do so.  The conclusion is so far gone at Christmastime that my mom purchases the gingerbread house for me before I even get to their house!  I also recruited a friend to help me out and make.

My friend and I had a lot of fun making the house, and finding a use for the Hot Tamales my friend had on hand.  The idea was a pretty neat one of using the White House as an inspiration for 4th of July creativity.  However, Trader Joe’s, is not immune to the anxieties and mistakes of even experienced bakers the first time they make a new item or try an experiment.  So a few notes before you try this at home…

  1. The columns at the front and back of the White House was tough to get to stay in place because you had to attach them to both the ground and the portico.  Fortunately the Hot Tamales were able to serve a double purpose of propping the loose columns up.
  2. The structure did not lie flat – there was about a centimeter gap at one end – fortunately we could plug that with just a little more icing!
  3. Along with icing/frosting as glue, we got a little impatient and decided to use commercially bought glue as well.  In this case, that was wood glue because that was what my friend had on hand.  I had to laugh at the end when she licked her finger – I asked immediately if that contained glue as well.  Fortunately, so is doing okay!

The funny thing was that Trader Joe’s also inspired my other creation for a 4th of July party.  I had a plan to originally make brownies (see the black bean raspberry brownie recipe), but I had to run out to get some of the ingredients before I could proceed.  More specifically I had to look at the recipe to remember to get coffee to use.  While I was at the Trader Joe’s I tried out the sample from their kitchen (read:  the sample station in the store), and I really enjoyed the 4th of July version of Eton mess.

Curious what the Eton mess is?  Research no further than this instructional video from Nigella Lawson.

Trader Joe’s marketed four products with their own version of this dish:  meringues, whipped cream, strawberries, and blueberries.  I caved in to buying three of the ingredients (everything is organic, by the way, with the exception of the meringues).  I decided to make my own whipped cream (took about 10 minutes the night before) rather than buy their version in the spray can.  Besides, I already had a square red Le Creuset dish I could use to serve it in.  Ironically I was serving an American version of an English dish in a piece of French cookware.

IMG_2607

Ingredients:

  • Container of Trader Joe’s vanilla meringues
  • 1 pint of strawberries
  • 1 pint of blueberries
  • 1 pint of heavy whipping cream

Instructions:

  1. Pour the heavy cream into a bowl and using an electric mixer, whip the cream until soft peaks form, and then put in the fridge until ready to mix all the ingredients together
  2. Wash all the fruit, slice the strawberries, and crush the meringue into smaller pieces (not too small though)
  3. Fold the strawberries, blueberries, and meringues into the whipped cream (you can make it like I did or buy it) gently and then spread the mixture into the bottom of the dish – leave enough strawberries, blueberries, and meringues so that you can make the topping of the dish!
  4. Top it off with blueberries in the top left hand corner as the stars, and meringues and strawberries that constituted the stripes
  5. Cover the dish with cling wrap and keep in the fridge until ready to serve

The best thing about the recipe (especially buying the meringues) was that I avoided putting on the oven in the Texas heat!

Black Bean Raspberry Brownies

I recently uploaded some newish photos to Facebook and one of them was of some black bean brownies I recently made – see my blog post.  A friend of mine who went to school with me in England, and now lives in Switzerland mentioned there was a spot in London with amazing black bean raspberry brownies.  Which of course spurred me into looking for recipes of my own online.  I found this recipe from Hummusapien, a blog run by Alexis who is a dietitian.

So not very long after finding this recipe (a matter of days really), I recruited a friend of mine who make recipes very similar to this one to come over and be my accomplice in sweet making.  Admittedly, I am on a brownie recipe search spree, so making these fit right in with my current agenda!  I really like the fudge-like texture of the brownies, and the raspberries complement the chocolate really well (hence why Theo Chocolate makes chocolate raspberry bars to begin with!).  To learn more about Theo Chocolate (and their chocolate factory tours!), please check out another recent blog post of mine.

Ingredients

  • 1 can of black beans (15 ounces), drained and well rinsed
  • 1/2 cup cacao powder (unprocessed cocoa)
  • 1/4 cup almond meal
  • 1/2 cup maple syrup
  • 2 eggs
  • 2 tablespoons coconut oil (melted)
  • 2 tablespoons brewed coffee
  • 1 1/2 teaspoons vanilla extract
  • 1 1/2 teaspoons baking powder
  • 1/2 teaspoon salt
  • 1.5 ounces Theo dark chocolate raspberry bar, chopped (half a bar)
  • 1/4 cup chocolate chips
  • 6 ounces raspberries (frozen or fresh, I used frozen)

Instructions

  1. Set oven to 350 degrees Fahrenheit
  2. Prepare the black beans by rinsing and draining them, chop the raspberry chocolate bar into smaller pieces, and melt the coconut oil
  3. Put the black beans into a food processor (or you can use a hand mixer) to puree them down into a paste
  4. Add the cacao, almond meal, maple syrup, eggs, coconut oil, coffee, vanilla extract, baking powder, and salt and blend until well combined
  5. Gently stir in the chopped Theo bar, chocolate chips, and raspberries until just combined
  6. Spoon the mixture into greased 8 by 8 inch pan (I greased mine with coconut oil) and bake for 35 minutes
  7. When do, check with a knife to make sure the center comes out clean, then let the brownies cool in the pan for a further 10 minutes before taking them out
  8. Remove the brownies from the pan, and cut into squares, then keep the brownies in the fridge to keep them fresh

Confession:  I made a tray of these and they only lasted through a long weekend!  I am a bit of a chocolate fanatic…

If you try these out or have another brownie recipe you like, please let me know!  This is my favorite recipe.

HW

Culinary Tour: Molly Moon’s

Those of you familiar with Seattle know that Molly Moon’s is synonymous with amazing homemade ice cream.  I lived in Seattle for four years during school, and I was fortunately to live there the first year that Molly Moon’s was open.  It is no secret that I love ice cream!  In fact, I recently visited the city again (and the weather was amazing!) and when driving by the original location in the neighborhood of Wallingford, I was practically salivating.  Fortunately it has become so popular that there are now seven locations through the metropolitan Seattle area!

There is probably no better way to spend a sunny warm evening in Seattle than walking through the park with an ice cream.  I checked out the Capital Hill location with my brother and it was just as heavenly as it always has been.  They have seasonal flavors, but they also have amazing flavors that they have pretty much all year.  They do let you sample out flavors before making the big decision too; I tried a few out before ultimately deciding on honey lavender, which was divine!

Here is a link to their website.  Their website has loads of information about their business, from the flavors to the ingredient sourcing.  I think the Milkfund is really neat and a wonderful way to remember the memory of Anna, the younger sister of Molly.  I love dogs and I love the Molly Moon’s logo, which is really Molly’s dog.

As you can tell from the images below, ice cream brings happiness and keeps chaos away!

The next time you are in Seattle, check one of their locations out!

HW