Culinary Tour: Molly Moon’s

Those of you familiar with Seattle know that Molly Moon’s is synonymous with amazing homemade ice cream.  I lived in Seattle for four years during school, and I was fortunately to live there the first year that Molly Moon’s was open.  It is no secret that I love ice cream!  In fact, I recently visited the city again (and the weather was amazing!) and when driving by the original location in the neighborhood of Wallingford, I was practically salivating.  Fortunately it has become so popular that there are now seven locations through the metropolitan Seattle area!

There is probably no better way to spend a sunny warm evening in Seattle than walking through the park with an ice cream.  I checked out the Capital Hill location with my brother and it was just as heavenly as it always has been.  They have seasonal flavors, but they also have amazing flavors that they have pretty much all year.  They do let you sample out flavors before making the big decision too; I tried a few out before ultimately deciding on honey lavender, which was divine!

Here is a link to their website.  Their website has loads of information about their business, from the flavors to the ingredient sourcing.  I think the Milkfund is really neat and a wonderful way to remember the memory of Anna, the younger sister of Molly.  I love dogs and I love the Molly Moon’s logo, which is really Molly’s dog.

As you can tell from the images below, ice cream brings happiness and keeps chaos away!

The next time you are in Seattle, check one of their locations out!

HW


Deliciously Ella: Raw Brownies

The first time I learned about Ella’s blog was from the sweet potato brownie recipe she published.  However, the prospect of cooking sweet potatoes was a little more daunting (especially in the Texas summer heat), so I looked around Ella’s recipe list for another prospective brownie recipe and came across this one.  I LOVE dates, so the prospect of dates plus other things I love, like chocolate (well, technically cacao) and maple syrup made this even more appealing.  For those of you who are not familiar with raw foods, these are foods that have not been cooked or heated to temperatures over 118 degrees Fahrenheit.  While often associated with hippies, it encompasses many foods and has many health benefits.  Like to eat apples?  That is an example of a raw food!

Deliciously Ella herself posted a video on how to make raw brownies (and it was the first recipe on her blog)!

Ingredients (makes about 10 brownies)

  • 2 cups medjool dates
  • 1 cup pecans
  • 2 to 3 tablespoons cacao powder
  • 2 tablespoons maple syrup (optional)

Instructions

  1. Put the pecans in a food processor and chop them
  2. Add the dates and blend again
  3. Next add the cacao powder and maple syrup until combined
  4. Put the mixture into a baking tray and refrigerate or freeze for several hours to help them set, then cut them into
  5. Keep the brownies in an airtight container in the fridge.

I love these brownies – please try them out!

HW


Culinary Tour: Hummingbird Bakery

London is the home to amazing museums, fantastic architecture, parks that I dream about in my sleep, and the absolute best red velvet cake I have ever had in my entire life.  Hummingbird Bakery is worth the trek with tiny London streets and masses of people in the Tube to try out these amazing confections.  I was first introduced to Hummingbird Bakery by a friend who grew up there, and swore by all the items they baked.  We were both grad students at Durham University at the time, and one day we found ourselves in London at the same time (absolutely no planning on this account either).  We called up a few other friends who were also in the city and put together an evening trying out some of foodie spots in London.  We went to a frozen yogurt parlor, Hummingbird Bakery, and dinner at a Moroccan/Turkish (yes, that is a combination) restaurant.  And that was also the exact order in which we ate our food.  We had to get those cupcakes before they ran out!

This past fall, I was in London for work and I met a friend at the British Library, which evolved into an afternoon spent wandering through the British Museum until they closed and then through the beautiful streets of London.  After a while, I mentioned I was hungry, so I decided to find Hummingbird Bakery to get something to eat (essentially substituting cupcakes for a proper dinner).  I did not have one, but TWO cupcakes as a meal.  And I regret nothing!  I took the cover photo at their location near the Soho Gardens, but they have several locations in London.  They also have several locations in Dubai.  Check out their website!  They also have a YouTube channel with some fantastic recipe demo videos!

Who else has tried out Hummingbird Bakery?  Leave comments about your experiences and favorite items in the comments below!

HW


Best Vanilla Cake

I am sure by now everyone thinks I only bake cakes and cookies that have some special ingredients or variations to them, but that is not always the case as some of the simplest recipes are the best ones!  Just this past weekend, I went to a friend’s retirement party and I volunteered to bake the cake.  And I chose to bake a vanilla cake with cream cheese frosting.  The photo illustrates how to further enhance the look of this fairly normal variety of cake (I will return to the decorations later).  My friends at the party (a group of hungry masters swimmers!) liked the cake, so I am going to post the recipe.

I think the simplest cakes like vanilla or chocolate require the most skill to find the best recipe and master.  Once again, the recipes section of the Williams-Sonoma website was my first stop on the search for recipes.  I knew that for a cake like vanilla, there needed to be additional liquid to make it more moist as many vanilla cakes can easily become dry.  The recipe is orientated towards kids baking (they have to start somewhere!) and I think that is mostly because it is a pretty simply flavor of cake.  It requires three bowls for me to make the recipe, and a number of ingredients, so it is certainly more advanced if kids do want to make it.

Here is the original recipes from the Williams-Sonoma website.

Ingredients

  • 2 1/4 cups plain flour
  • 1 tablespoon baking powder
  • 1/4 teaspoon salt
  • 6 ounces butter (unsalted)
  • 1 3/4 cup sugar
  • 2 teaspoons vanilla extract
  • 3 eggs
  • 1 1/3 cup milk
  • Frosting of your choice (pick your own frosting recipe!)

Instructions

  1. Set the oven to 350 degrees Fahrenheit
  2. Grease two round cake pans with butter, then sprinkle flour in then and tap the tins to make sure it is evenly spread in each of the tins (you might want to check out YouTube if you have not done this before)
  3. Mix together the dry ingredients (flour, baking powder, and salt) together well in a bowl
  4. Cream together the butter, sugar, and vanilla extract in another bowl for about 3 minutes
  5. Add the eggs to the butter/sugar mixture one-by-one until blended
  6. Next add the flour mixture and milk in alternating sequences as follows (measurements are rough estimates)
    1. Add 1/3 flour mixture to the butter/sugar/egg batter, then mix until blended
    2. Add 2/3 of the milk, then mix until blended
    3. Add 1/3 flour mixture, then mix until blended
    4. Add the rest of the milk, then mix until blended
    5. Add the rest of the flour, then mix until blended
  7. Spoon the batter into the cake tins so that the batter is evenly distributed between the two tins
  8. Bake in the oven for 35 minutes, or until a toothpick comes out of the center of the cake cleanly
  9. Let cakes cool in tins for 20 minutes, then take them out of the tins and cool completely
  10. Once the cakes are completely cool, you can frost and decorate them as you choose (be creative!)

For the decorations, I went in pursuit of something to put on the cake the very morning of the party.  For those of you from Houston, Texas, you know Arne’s (the party warehouse).  I headed there as early as I could to avoid on the onslaught of the moms planning a “Frozen” party and was able to peruse around the store in relative peace.  Unfortunately, they did not have the decorations I wanted to put on top (just a “Congratulations!” sign or something along those lines), so I left the store.  Which furthermore validates my theory that if you are looking for something specific, yet relatively simple, there is 100% chance that none of the stores you visit have it.  I had to go to Target that morning anyways because I was running low on a few necessities, so a quick stop in the party section landed me the very colorful paper cake toppers.  A trip to Whole Foods later that day found me the sprinkles you see on the sides of the cake (and yes, those are organic, gluten-free, and vegan, but not that anyone is counting, right?).

The cake can easily feed a small army (even of hungry swimmers) and I still had some cake leftover.  You can really make it in whatever frosting you want, but I chose cream cheese frosting because it is my favorite.  I have made more exotic varieties before like peanut butter frosting.  Be imaginative with the frosting and the decorations!

HW

Nigella Lawson: Caramel Croissant Pudding

The first time I ever heard of Nigella Lawson was from my mother who owns a few of her cookbooks.  Nigella is quite a legend in many ways – she is the daughter of Nigel Lawson (a prominent British politician), and she has succeeded in the culinary world, despite not have any of the culinary credentials (like going to cooking school).

I have tried out a few of her recipes, but the one I am fondest of is the Caramel Croissant Pudding.  If you look at the list of ingredients in the recipe is probably immediately clear why the recipe is so delicious – it contains sugar, fat, and alcohol, and all in large quantities (so certainly not a health dish).  I think it would be a great dish to do for hosting a brunch with some girlfriends and with some wine or cocktails.

Ingredients

  • 2 croissants (preferably old ones as this is essentially a bread pudding)
  • 1/2 cup sugar
  • 2 tablespoons water
  • 1/2 cup of heavy cream
  • 1/2 cup of whole milk
  • 2 tablespoons bourbon or rum
  • 2 large eggs, beaten

Instructions

  1. Preheat the oven to 350 degrees Fahrenheit
  2. Tear croissants apart and put in the bottom of a small bakeware dish – I like my 10 by 10 shallow Le Creuset dish
  3. Put the sugar and water together in the saucepan and heat on low until it is dissolved; after that turn in up to higher heat so it starts bubbling – look for it to turn a deep amber color (should take about 3 to 5 minutes)
  4. Once it is an amber color, turn down the heat to low and add the cream, then whisk in the milk and bourbon until it has a light custard-like texture
  5. Take the mixture off the heat and add the eggs, whisking them into the custard mixture
  6. Pour the mixture over the croissants in the dish, then leave to steep for 10 minutes
  7. Bake in the over for 20 minutes; it should be puffy on the top when you take it out

This recipe is definitely a special treat – but it is always a hit when made!  Try it out the next time you host a brunch.

HW

Carrot Orange Cupcakes

It probably surprises no one that I worked in Williams-Sonoma for several years when I was in college.  Chuck Williams founded his namesake store in Sonoma, California in 1956 to bring French cookware to American chefs (sounds a bit like Julia Child, right?).  To this day, they have some of the best quality cookware in their stores, and although I am not a huge fan of their in-store food selection, they have an absolutely fantastic selection of recipes in every category imaginable online at williams-sonoma.com.  I am much more of a baker than a cook, so I naturally gravitate towards the desserts and sweets section.  For every category, there is an extensive array of recipes and many of them have reviews that you can check out before you attempt them yourself.

When I was in graduate school, I had a tiny kitchen which was equipped with a minimal amount of cookware and equipment.  This meant that because I did not have a mixer I creamed the butter and sugar by hand with a spoon.  Fortunately, I now have a properly equipped kitchen, so baking this recipe is just that much easier.  I like the way this recipes uses orange in both the cake and the frosting!  This is also my favorite cupcake that I bake – it is absolutely delicious!

Here is the original recipe on the Williams-Sonoma website.

thumb_IMG_1796_1024

Adapted from New Healthy Kitchen Series, Desserts, by Annabel Langbein (Simon & Schuster, 2006).  Courtesy of Williams-Sonoma

Ingredients

  • 1/3 cup butter PLUS a few more tablespoons for the frosting
  • 3/4 cup sugar
  • 1 tablespoon honey or maple syrup
  • 1 tablespoon grated orange zest
  • 2 eggs
  • 1 cup grated carrot
  • 1 cup PLUS 2 tablespoons plain flour
  • 2 teaspoons baking powder
  • 7 tablespoons orange juice, warmed
  • 1 teaspoon baking soda
  • 1 1/2 cups powdered sugar
  • 1 teaspoon lemon zest (you can also use orange zest)
  • 4 ounces cold mascarpone or low-fat cream cheese (I used mascarpone cheese)

Instructions

  1. Preheat the oven to 350 degrees Fahrenheit and place 12 liners in a muffin tin
  2. In a bowl, cream together the regular sugar, 1/3 cup of butter, maple syrup, and the orange zest until the mixture is creamy and pale
  3. Next add the eggs, one-by-one, and then add the grated carrots to the mixture
  4. In another bowl mix together the flour and baking powder
  5. In yet another bowl, combine the warmed orange juice and baking soda (it will create a reaction)
  6. Alternate adding the flour and orange mixture to the butter mixture by first adding 1/3 of the flour mixture, then 1/2 of the orange mixture, then another 1/3 of the flour mixture, then the rest of the orange mixture, and finally the last of the flour mixture (I always end with the flour mixture), and mixing together the batter until just smooth (you do not want tough cupcakes!)
  7. Bake the cupcakes for 20 minutes in the oven until the tops are golden brown (these cupcakes are a little more moist than typical cupcakes)
  8. Let the cupcakes cool in the tin for about 10 minutes then transfer to a wire rack to cool completely (I often put the cupcakes in the refrigerator after that as well – it makes it easier to frost them later)
  9. To make the frosting, put the remainder of the butter, powdered sugar, zest, and mascarpone/cream cheese in a mixing bowl and beat with an electric mixer until smooth – put in the refrigerator to cool down
  10. After a few hours, take out both the cupcakes and frosting and frost the tops of the cupcakes, then put back in the refrigerator to keep them set

A few notes:  the recipe calls for 3/4 stick of butter for the frosting, but I cannot bring myself to put that much butter in the frosting, especially seeing as there is already mascarpone/cream cream in the frosting.  However, if you like stiffer frosting that is more like buttercream, feel free to put more butter in the mixture.  Once you make frosting enough you become a pro at it  – I do not pay much attention to exact measurements for frosting!

HW

The All-Encompassing Cookie Diagram

I like to think of being a baker as being a scientist – it certainly involves chemicals (ingredients) mixed together and then causing a reaction (baking them).  This was completely reinforced for me when I was about seven years old and watched my all time favorite “Magic School Bus” episode that involved (**plot spoiler**) the bus shrinking and getting stuck inside a cake.  The best part for me was that the chemistry lab was a bakery kitchen!  That is my favorite kind of science.

Which got me thinking recently when I saw this diagram on what happens when you take the conventional chocolate chip cookie and make adjustments to the recipe.  This is very similar to a chemistry experiment that involve making changes to the control variables.  I apologize for the sheer number of chocolate chip cookies in the chart below, but it is fascinating to me to see the results of all the permutations of a simple chocolate chip recipe.

I have always used butter (never shortening!), an AirBake baking tray, and chilled the dough for a few hours before baking the cookies with all my cookie recipes.  I stubbornly stick to these methods without realizing it I suppose!  I have tried different ingredients such as coconut oil and ground flax seeds (in place of eggs) in other cookie recipes with mixed results.  I personally think that brown sugar (or raw sugar for that matter) is the most aesthetically pleasing for chocolate chip cookies at is gives the end product a lovely golden brown color.

Ultimate-Guide-to-Chocolate-Chip-Cookies-Collage

I have a favorite chocolate chip recipe (which is not a secret and can be easily found online)  that is not only of the recipes above.  I will post it soon; keep your eyes peeled!

HW

Culinary Tour: Norway’s Best Cake

Speaking of Scandinavia, have you ever skipped the whole furniture part of Ikea and gone directly to the cafeteria?  (I have.)  They have this fantastic almond cake that they serve in single slices (for the record, you can also get a whole frozen almond cake at the store as well).  Like British baking, Scandinavian baking is not terribly sweet and focuses on a texture quite a bit.  Lots of American cakes use a generous amount of frosting, while British and Scandinavian cakes often completely skip the icing.

This cake was dubbed crowned the best cake in Norway a few years ago.  A friend made half the recipe for a party last summer and I liked it so much that I made the entire cake TWICE in a two week period (in my defense it was around Thanksgiving).  The cake has five layers to it:  a yellow cake base, a meringue layer with almonds, a layer of vanilla cream, another layer of yellow cake, and finally another meringue layer with almonds (see the photo above).  Don’t be intimidated by working with meringue!  Just remember to beat the egg whites with clean beaters and not let any other parts of the mixture get in the meringue mixture.  The slight challenge of the recipe is worth it!

World’s Best Cake

  • 10 1/2 tablespoons butter, softened
  • 1 2/3 cups sugar
  • 1 1/3 cups plain flour
  • 1 teaspoon baking powder
  • 5 large eggs, separated into yolks and whites
  • 1/3 cup whole milk
  • 1/4 cup sliced almonds
  • 1 cup heavy cream
  • 1/2 vanilla bean pod (1/2 teaspoon of vanilla essence would work as well)
  1. Preheat the over to 350 degree Fahrenheit and place a rack in the center of the oven.  Put parchment paper on the bottom of an 8 by 12 baking pan (use a metal pan)
  2. Beat the butter and 2/3 cup sugar in a bowl with an electric mixer for about 3 minutes
  3. Add the flour and baking powder to the mixture and mix well on low speed
  4. Mix in the egg yolks and milk, then spread batter into the baking pan
  5. In a CLEAN BOWL, beat the egg whites until they form peaks, then add the sugar until the mixture is stiff
  6. Spread the meringue on the top of the batter and sprinkle almonds on top of that
  7. Bake for 30-35 minutes, or until the top of the meringue is puffed and golden brown, then cool on a wire rack in the pan
  8. Transfer the cake to a cutting board and when the cake is cool, cut it into two pieces (be careful with the meringue!)
  9. Put the cream and vanilla in a bowl and beat until it forms solid peaks
  10. Spread the cream across the top of ONE of the side of cake, then stack the other side of the cake on top of that
  11. Let the cake sit in the fridge for about an hour before serving

It is a fantastic cake to bring to a party!  Please post any comments or questions below.

HW

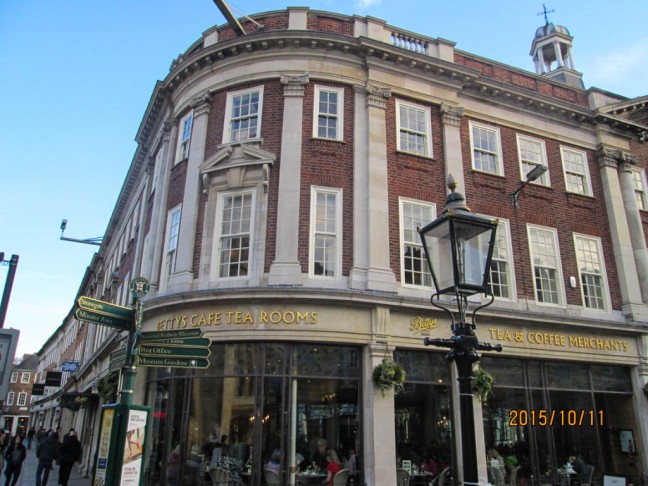
Why I love Betty’s Tea Room and York

I am so lucky because I spent a number of sunny summer days as a child exploring the city of York in the north of England.  I can remember going to the incredible train museum (located right next to the railway station fittingly) and wondering around the medieval narrow streets of the city called The Shambles.  You cannot miss the York Minster as you approach the city from any direction or forget the absolutely magnificent stained glass windows on every wall of the church.  For those who love architecture like I do, the York Minster is the largest Gothic cathedral in northern Europe.  There is a stained glass window inside (see the photo below) that is the size of a tennis court.  Of course, the stained rose glass window  on the southern transept is one of the most beautiful of its kind in the world, and was thankfully saved from a fire that destroyed the transept roof in the summer of 1984.  Read about the incident here and how the community of York rallied to rebuilt the minster.

thumb_IMG_1319_1024

However, this blog is about sweets and an visit about one of my favorite places in the world is not complete without going to Betty’s Tea Room in the center of the town.  The restaurant is famed for its amazing dessert cart and for serving Fat Rascal’s (scones), which are pictured below (these are my version).

thumb_IMG_1658_1024

It is not surprising that people will wait hours to get a spot at the restaurant, which is always crowded, even with an upstairs and downstairs seating section.  Go early so you also get the best items!  I went back to Betty’s before walking back to get my train and managed to buy one of the last Fat Rascals they were selling.

thumb_IMG_1333_1024

Needless to say, none of the baked items made it back to London!

HW

“The Great British Bake Off”

I learned how to bake well before this show debuted in 2010, but the impact of this televised baking competition boosted the popularity of home baking in the United Kingdom.  The show is hosted by acclaimed chef Mary Berry (who is more informally known as “Mary Queen of Cakes”) and Paul Hollywood.  The show is on BBC One, and recipes from the show do get published online as well.  Mary Berry, I would like to add, is a fantastic looking 80 years lady.  If there is a secret to living a long life like that, I would like to think that baking and eating the results contribute directly to it!

Great British Bake Off
Programme Name: Great British Bake Off – TX: n/a – Episode: n/a (No. n/a) – Embargoed for publication until: 13/08/2013 – Picture Shows: (L-R round semi-circle) Glen, Ruby, Frances, Howard, Christine, Ali, Deborah, Mel Giedroyc, Sue Perkins, Paul Hollywood, Mary Berry, Lucy, Beca, Kimberley, Rob, Toby, Mark, – (C) Love Productions – Photographer: Des Willie

The most recent recipe from the show that I tried were these mini apple and almond cakes, which were fantastic.  My mom recommended this recipe to me – the only thing a baker might need to pick up is metal rings to cook these mini cakes in.

Mini apple and almond cakes (make 6 small cakes)

  • 3 ounces butter, melted, plus more for greasing rings
  • 4 ounces sugar
  • 4 ounces self-raising flour
  • 1 egg, lightly beaten
  • 1/2 teaspoon almond extract (this is a British teaspoon!)
  • 2.5 ounces Bramley apples, peeled and thinly sliced
  • 0.5 ounces flaked or sliced almonds
  1. Preheat the oven to 350 degrees Fahrenheit and grease the insides of the metal rings with a bit of butter, then place the rings on a baking sheet covered in baking paper
  2. Mix the melted butter, sugar, flour, egg, and almond extract together in a bowl until combined
  3. Spoon a bit of the cake mixture into the bottom of each ring, then put some of the apple slices on the mixture, then over up the apples with the cake mixture, and finally sprinkle the tops of the cakes with the almonds
  4. Bake for 25 to 30 minutes when the cakes have risen and the tops are golden brown, then set aside for 10 minutes to cool
  5. Serve warm with a bit of crème fraîche or by itself (I like a bit of vanilla ice cream!)

Enjoy!  Please provide feedback on the “The Great British Bake Off” if you have seen it or the recipe if you decide to give it a try.  Thank you for stopping by!

HW